
Creating a DIY Tiffany lamp shade allows enthusiasts to infuse their own creativity and personal touch into the intricate art of stained glass crafting, much like the innovative spirit embodied in the concept of DIY projects. The term “DIY Tiffany Lamp Shade” encompasses the rewarding process of handcrafting a unique lamp shade, allowing individuals to express their artistic flair while honoring the timeless tradition of Tiffany-style craftsmanship.
This post is an inspiring and practical guide, empowering readers to embark on the enriching journey of creating their Tiffany-style lampshade. Whether you’re a seasoned crafter or a novice DIY enthusiast, delving into crafting a custom lampshade will showcase your creativity and deepen your appreciation for the intricate beauty of Tiffany-style stained glass.
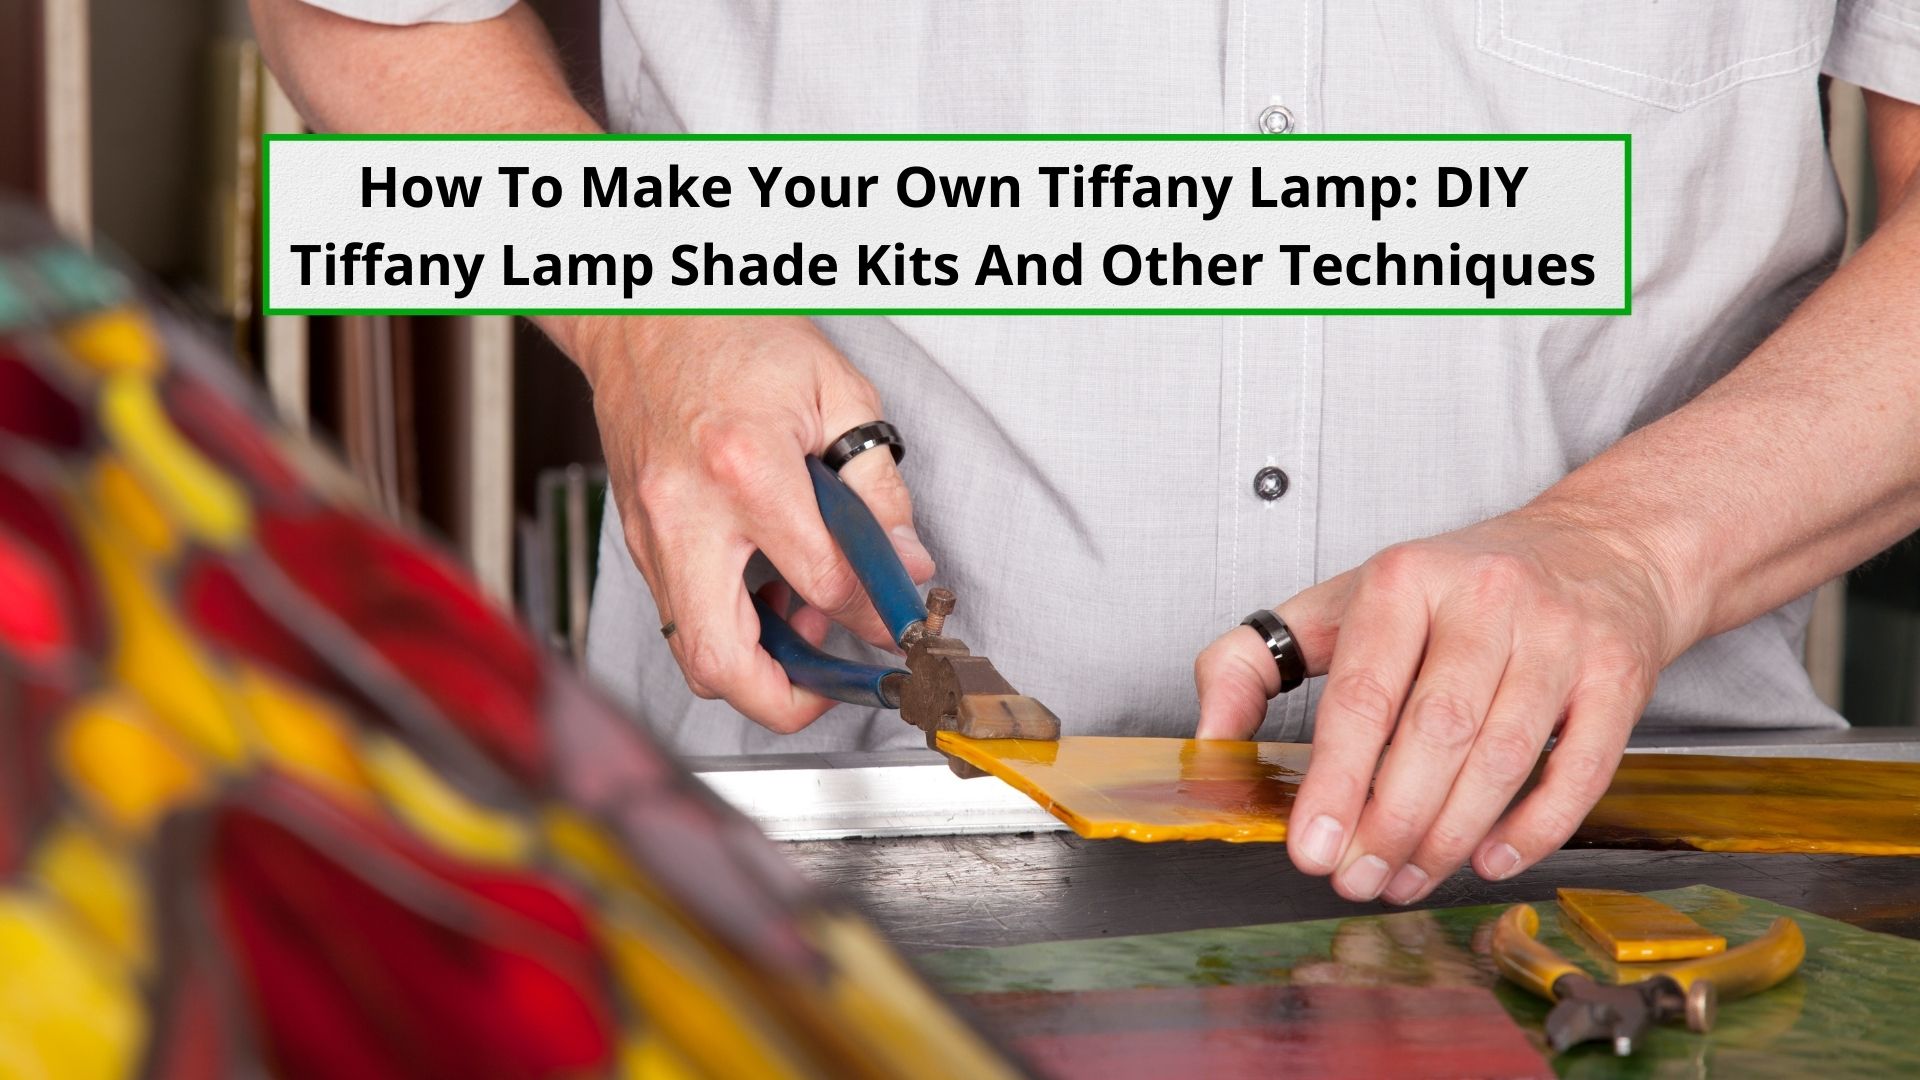
Table of Contents
Disclaimer
As an affiliate, we may earn a commission from qualifying purchases. We get commissions for purchases made through links on this website from Amazon and other third parties.
Introduction to Tiffany Lamp Crafting
Tiffany lamps are stained glass lamps that became popular in the late 19th and early 20th centuries. They are known for their intricate designs and colorful glass shades.
While original Tiffany lamps can be quite expensive, DIY enthusiasts can create their versions using Tiffany lamp molds, kits, and other materials.
History of Tiffany Lamps
Louis Comfort Tiffany first introduced Tiffany lamps in the late 1800s. Tiffany was an American artist and designer known for his stained glass work. He created the first Tiffany lamp in 1895, and they quickly became popular with the upper class.
Tiffany lamps were made by hand, with each piece of glass cut and soldered together.
Benefits of DIY Tiffany Lamps
Making your own Tiffany lamp can be a fun and rewarding DIY project. You will not only have a unique piece of art to display in your home, but you will also be satisfied to know that you created it yourself.
DIY Tiffany lamps can be customized to fit your style and taste, making great gifts for friends and family.
In addition to being a fun and rewarding DIY project, making your Tiffany lamp can also be cost-effective.
While original Tiffany lamps can be quite expensive, DIY enthusiasts can create their own versions at a fraction of the cost using Tiffany lamp molds, kits, and other materials.
Designing Your Tiffany Lamp
Designing a Tiffany lamp is a creative and rewarding process that allows you to showcase your style and artistic vision.
Choosing a Pattern
The first step in designing your Tiffany lamp is to choose a pattern. Tiffany lamps are known for their intricate and detailed patterns, ranging from simple geometric shapes to elaborate floral motifs.
When choosing a pattern, consider the size and shape of your lamp and the overall aesthetic you’re trying to achieve.
Selecting Stained Glass
Once you’ve chosen a pattern, the next step is to select your stained glass.
Tiffany lamps are made using various types and colors of stained glass, which can be used to create unique and striking visual effects.
When selecting your stained glass, consider your lamp’s color palette, as well as the quality and texture of the glass itself.
Incorporating Personal Style
Finally, when designing your Tiffany lamp, make sure to incorporate your own personal style and artistic vision.
Whether you’re looking to create a traditional lamp with classic motifs or a more modern and abstract design, there are countless ways to personalize your lamp.
Consider experimenting with different color combinations, textures, and materials to create a beautiful and unique lamp.
Gathering Supplies and Tools
Essential Materials
When embarking on a DIY Tiffany lamp project, gathering all the essential materials is vital.
These materials include a Tiffany lamp mold, a pattern, glass, a soldering iron, a cutter, pliers, and a grinder.
It is important to note that no unique or unusual tools are needed. These essential glass-working tools are available at most hardware stores and online.
In addition to the tools, you also need to have suitable materials.
Tiffany lamps use glass in a variety of colors and textures. It is crucial to choose the right glass for the desired effect. To fit the mold, the glass should be cut according to the pattern and ground.
Finding Affordable Supplies
Finding affordable supplies for Tiffany lamp projects can be challenging.
One way to save money is by looking for supplies at garage sales or thrift stores. These places often have old lamps or lampshades that can be repurposed for a Tiffany lamp project.
Another way to save money is by purchasing a DIY Tiffany lamp kit.
These kits include all the necessary materials and instructions for making a Tiffany lamp. They are often more affordable than buying the materials separately.
When purchasing supplies online, make sure to compare prices and read reviews. Some online retailers offer discounts for bulk purchases or for signing up for their email list.
Creating the Lampshade
To achieve the iconic stained glass look, creating a Tiffany-style lampshade requires a few specific steps. The process can be broken down into three main steps: cutting and shaping glass, applying copper foil, and soldering pieces together.
Cutting and Shaping Glass
The first step in creating a Tiffany-style lampshade is to cut and shape the pieces of glass that will make up the design.
This requires a steady hand and a glass cutter tool. The glass pieces can be cut into various shapes and sizes to create the desired pattern.
Applying Copper Foil
Once the glass pieces have been cut and shaped, the next step is to apply copper foil to the edges.
This is done by wrapping a thin strip of copper foil around the edge of each piece of glass. The foil helps to hold the pieces together and provides a surface for the solder to adhere to.
Soldering Pieces Together
The final step in creating a Tiffany-style lampshade is to solder the pieces of glass together.
This is done by heating up a soldering iron and melting a small amount of solder onto the copper foil seams between each piece of glass. The solder fills the gaps and creates a strong bond between the pieces.
The finished lampshade can be polished and patinaed for a professional, antique look. With practice and patience, anyone can create a beautiful Tiffany-style lampshade that adds elegance to any room.
Assembling the Lamp Base
Selecting a Base
When assembling a DIY Tiffany lamp, selecting the right base is crucial.
The base of the lamp should be sturdy enough to support the weight of the lampshade while also complementing its style. A cement or metal base is a popular choice as it provides a solid and stable foundation for the lamp.
Attaching the Lampshade
Once the base has been selected, attaching the lampshade is time.
First, ensure that the lampshade fits securely onto the base. The lampshade can be attached to the base using screws or adhesive.
If using screws, drill holes into the base to match the holes on the lampshade frame. Then, attach the lampshade to the base using screws and nuts.
When attaching the lampshade to the base, ensure that the electrical wiring is properly routed and secured. This will prevent accidents or damage to the lamp.
Finishing Touches
After assembling the Tiffany lamp, it’s time to add the finishing touches to make it look more polished and professional. This section covers some essential steps to make your DIY Tiffany lamp look stunning.
Applying Patina
Applying a patina is an essential step in finishing a Tiffany lamp. It gives the lamp a unique and antique look that is synonymous with Tiffany lamps.
You’ll need a brush, gloves, and a patina solution to apply the patina.
Before applying the patina, ensure the solder lines are clean and free of flux residue. Then, using a brush, apply the patina solution to the solder lines. Wear gloves to avoid staining your hands.
After applying the patina, let it dry for a few minutes, then wipe off any excess with a soft cloth. Repeat the process until you achieve the desired look.
Sealing and Protecting
Sealing and protecting your Tiffany lamp is crucial to ensure it lasts years.
You’ll need a sealant, a brush, and a soft cloth to seal and protect your lamp.
First, ensure the lamp is clean and free of dust or debris. Then, using a brush, apply the sealant to the lamp’s surface, including the solder lines and the glass pieces.
After applying the sealant, let it dry for a few hours, then wipe off any excess with a soft cloth. Repeat the process until you achieve the desired level of protection.
It’s important to note that some sealants may change the color of the solder lines, so it’s best to test a small area before applying it to the entire lamp.
DIY Tiffany Lamp Kits and Molds
Creating your own Tiffany lamp can be a fun and rewarding DIY project. There are many ways to approach the process, but one popular method is to use pre-made kits or molds.
Using Pre-Made Kits
Tiffany lamp kits include all the materials and instructions for creating your lamp. These kits typically include a lamp base, stained glass pieces, copper foil, solder, and a lampshade pattern.
They are available in various sizes and styles, so you can choose one that fits your needs and preferences.
Using a pre-made kit can be an excellent option for those new to lamp-making or who prefer a more straightforward process. Since the materials and instructions are already provided, it can also save time and effort. However, remember that these kits may limit your creativity and customization options.
Working with Molds
Another option is to use molds to create your lampshade.
Tiffany lamp molds are designed to help you shape and solder the stained glass pieces into a lampshade form. These molds come in various shapes and sizes, allowing you to create a unique and personalized lamp.
Working with molds can be more challenging than pre-made kits, as it requires more skill and experience. However, it can be more rewarding since it allows for creativity and customization. Plus, once you have the mold, you can create multiple lamps in the same style.
Alternative Tiffany Lamp Ideas
If you’re looking for a unique way to add vintage charm to your home, a Tiffany-style lamp can be a great option. While traditional Tiffany lamps can be pretty expensive, several alternative ideas for making your lamp can save you money and allow you to customize the design to your liking. This section will explore a few of these ideas.
Upcycling and Repurposing
One option for creating a DIY Tiffany lamp is to upcycle or repurpose existing materials. For example, you can use an old lamp base and shade and add a Tiffany-style lampshade to create a new look. Alternatively, you can use vintage glassware, such as vases or bowls, to create a unique lamp base.
This can be a great way to repurpose items that might otherwise end up in landfills.
Tiffany Lamp Reproductions
Another option for creating a DIY Tiffany lamp is a reproduction kit. These kits typically come with all the materials you need to make a lamp in the Tiffany style, including a lamp base, a lampshade mold, and stained glass pieces. While reproductions may not be as valuable as original Tiffany lamps, they can still be beautiful and give your home a vintage look.
When using a kit, follow the instructions carefully to ensure that the lamp is safe and functional. Also, choose a kit appropriate for your skill level. Some kits may be more advanced and require more experience with stained glass work.
Fabric Tiffany Lamp Shades
Consider using fabric to create a lampshade for a unique twist on the traditional Tiffany lamp. While fabric lampshades may not have the same stained glass look as traditional Tiffany lamps, they can still give your home a vintage look. Additionally, fabric lampshades can be easier to work with than stained glass, making them an excellent option for beginners.
To create a fabric lampshade, you’ll need a lampshade frame, fabric, and glue. Simply cut the fabric to the appropriate size and shape and glue it to the lampshade frame. To create a more decorative look, you can add embellishments, such as beads or sequins.
Troubleshooting and Maintenance
Repairing Common Issues
DIY Tiffany lamps may experience some common issues that can be repaired at home. One of the most common issues is a loose or broken glass piece. If the glass piece is loose, you can reattach it using a strong adhesive such as JB Weld. If it is broken, you can replace it with a new one.
Use the same type of glass as the original piece to maintain the lamp’s quality and look.
Another common issue is a loose or damaged solder joint. You can repair solder joints using a soldering iron and a new solder. Just make sure to use the same type of solder as the original joint to maintain the strength and durability of the lamp.
Cleaning and Care
To maintain a DIY Tiffany lamp’s beauty and longevity, it is essential to clean and care for it properly. Regular dusting with a soft cloth or feather duster is recommended to prevent dust buildup on the glass pieces.
If the lamp has been exposed to smoke or other airborne pollutants, clean it with a mild soap and water solution.
Avoid using abrasive cleaners or scrubbers to maintain the patina on the soldered joints. Instead, use a soft cloth or sponge with a mild soap and water solution.
If the patina has faded or become discolored, you can restore it using a patina restoration solution.
In addition to regular cleaning, handle the lamp carefully to prevent damage to the glass pieces or soldered joints. The lamp should be moved and stored carefully and should not be exposed to extreme temperatures or direct sunlight.
Frequently Asked Questions
What are the essential materials needed for making a Tiffany style lamp?
To make a Tiffany-style lamp, you will need the following materials:
- Glass (in various colors and textures)
- Copper foil tape
- Soldering iron and solder
- Lamp base
- Lampshade mold
- Lamp kit (if making a table lamp)
What techniques are used to create the stained glass effect for a DIY Tiffany lamp shade?
You must cut the glass into various shapes and sizes using a glass cutter to create the stained glass effect. Then, you will wrap each piece of glass with copper foil tape and solder them together to create the lampshade.
How do you assemble a Tiffany lamp kit for a table lamp?
To assemble a Tiffany lamp kit for a table lamp, follow the instructions that come with the kit. Typically, you will attach the lamp socket to the lamp base and assemble the lampshade using the abovementioned techniques. Finally, you will attach the lampshade to the lamp base.
What are the steps to safely solder a Tiffany lampshade?
To safely solder a Tiffany lampshade, you should:
- Wear protective gloves and eye goggles
- Heat the soldering iron to the appropriate temperature
- Apply flux to the copper foil tape
- Hold the soldering iron at a 45-degree angle and touch it to the copper foil tape
- Apply the solder to the joint
- Repeat the process until all joints are soldered
How can you distinguish between an authentic Tiffany lamp and a replica?
Authentic Tiffany lamps are rare and valuable, so it is essential to distinguish them from replicas. One way to tell is by looking at the base of the lamp. Authentic Tiffany lamps will have a bronze base with a patina that has developed over time, while replicas often have a shiny, new-looking base.
Another way to tell is to examine the glass. Authentic Tiffany lamps will have hand-cut glass that is imperfect, while replicas often have machine-cut glass that is uniform in shape.
What are some creative ideas for designing your own Tiffany lamp shade?
When designing your Tiffany lampshade, you can get creative with the glass’s colors and textures. You can also experiment with glass pieces of different shapes and sizes to create unique patterns and designs.
Some design ideas include nature scenes, geometric patterns, and abstract shapes.

Leave a Reply